
In order to receive the full protection provided by a respirator, the respirator must be properly worn. This page provides general instructions for donning (putting on) and doffing (taking off) the most common styles of respirators used at the University of Toronto.
General Reminders
- Ensure you are wearing the respirator that you have been successfully fit-tested with (same brand, model, and size).
- Ensure you have been trained and fit-tested within the last 2 years.
- Remember to be clean-shaven where the respirator forms a seal with your face.
- Perform hand hygiene before and after wearing the respirator.
- Perform adjustments to the respirator away from the contaminated work area.
- Do not fold the respirator or put it in your pocket for later use.
- Do not hang or dangle the respirator around your neck.
- For disposable N95s: Change the respirator if wet or soiled or if breathing becomes difficult.
- For elastomeric respirators, change the filter/chemical cartridge if wet or soiled or if breathing becomes difficult.
- For elastomeric full-face respirators: If you require prescription eyewear, use a spectacle insert (specific to your brand/model of respirator).
Donning/Doffing N95 Respirators
Filtering facepiece N95 respirators used at the University of Toronto generally fall under one of three design variations. As the instructions for donning/doffing N95s may vary depending on the brand and model, users should always follow the manufacturer’s instructions for their specific respirator. Below are training videos and written instructions with pictures (in PDF format) for some of the most common N95s used at the University.
 |
 |
 |
| Cup-Shaped (Cone-Shaped) N95 | Flat-Fold N95 | Pleated N95 |
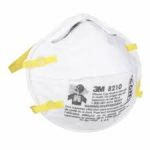
Cup-Shaped (Cone-Shaped) N95 Respirators
Examples: 3M 1860/1860S, 3M 8110S/8210, 3M 8511, Moldex 2200/2300/2400 series.
Respirator fitting instructions for cup-shaped (cone-shaped) N95s:
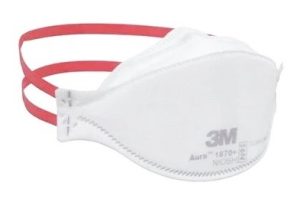
Flat-Fold N95 Respirators
Examples: 3M Aura 1870+, 3M Aura 9210+
Respirator fitting instructions for flat-fold N95s:
Pleated N95 Respirators
Examples: 3M VFlex 1804 / 1804S, 3M VFlex 9105 / 9105S
Respirator fitting instructions for pleated N95s
Donning/Doffing Elastomeric Respirators
Both tight-fitting elastomeric half-face and full-face respirators are used at the University of Toronto. As the instructions for donning/doffing elastomeric respirators vary depending on the brand and model, users should always follow the manufacturer’s instructions for their specific respirator. Below are training videos and written instructions with pictures (in PDF format) for some of the most common elastomeric respirators used at the University.
 |
 |
| Elastomeric Half-Face | Elastomeric Full-Face |
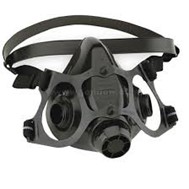
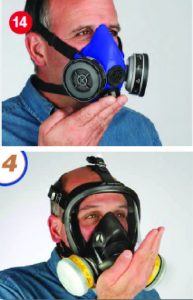
Elastomeric Half-Face Respirators
Examples: Honeywell North 7700 Series, 3M 6000 and 6500 Series
Honeywell North 7700 Series: NorthSafety.com
Respirator Fitting Instructions for Half-Face Respirators
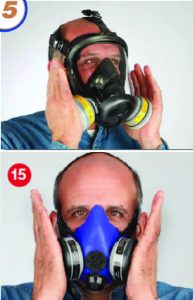
Elastomeric Full-Face Respirators
Examples: Honeywell North 5400 and 7600 series, 3M 6000 series
Respirator Fitting Instructions for Full-Face Respirators
Powered Air Purifying Respirators
Examples: 3M Versaflo PAPR TR-300 and TR-600 Series, Honeywell North Primair PA700, ILC Dover Sentinal XT
As the instructions for assembling/donning/doffing PAPRs vary depending on the brand and model, users should always follow the manufacturer’s instructions for their specific PAPR. Below are training videos and written instructions with pictures (in PDF format) for some of the most common PAPRs used at the University.
User Instructions for PAPR Systems
Performing User Seal Checks
N95 Respirator User Seal Check
Check the seal of your N95 respirator each time you use your respirator.
 |
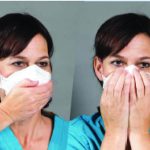
Cup-Shaped (Cone-Shaped) N95 Cover the respirator with both hands. Inhale and exhale sharply and feel for air leaking around the nose or respirator edges. If air leaks around your nose, re-adjust the nosepiece. If air leaks at respirator edges, reposition the straps. Repeat the user seal check until you can achieve a proper seal. |
 |
Flat-Fold N95 Place one or both hands over the middle panel. Inhale and exhale sharply. If air leaks around your nose, re-adjust the nosepiece. If air leaks around respirator edges, adjust panels and position of straps. Repeat the user seal check until you can achieve a proper seal. |
 |
Pleated N95 Place both hands completely over the respirator. Inhale and exhale sharply and feel for air leaking around the nose or respirator edges. If air leaks around the nose, re-adjust the nosepiece. If air leaks around respirator edges, adjust the position of straps. Repeat the user seal check until you can achieve a proper seal. |
Elastomeric Respirator User Seal Check
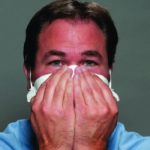
Perform a seal check using both the negative and positive pressure methods each time you use your elastomeric half-face or full-face respirator.
| Negative Pressure Check | |
 |
|
| Positive Pressure Check | |
 |
|
Inspecting Respirators
Inspection of N95 Respirators
- Inspect the respirator before each use to ensure that it is in good operating condition.
- Examine all the respirator parts for signs of damage including the two headbands, staples, nose foam, nose clip and facepiece material.
- The respirator should be disposed of immediately upon observation of damaged or missing parts.
Inspection of Elastomeric Respirators
- Inspect the respirator before each use (e.g., face piece, face piece seal, harness, and cartridges/filters). If any parts are missing or damaged, replace those parts or the entire mask.
- Check the facepiece seal and head straps for loss of elasticity and signs of wear, such as cracking, tears. Check head straps for loose or broken buckles and twisted straps.
- Inspect the facepiece lens for cracks, excessive scratches, and distortion.
- Check the cartridge connectors for cracks. Ensure cartridges or filters are threaded properly onto the cartridge connectors. Do not overtighten.
- Check the inhalation and exhalation valves for missing or worn valve covers, cracks, and dirt.
- Report any defects or damages to your supervisor and them replace the part (or respirator, if necessary) with a new one.
Cleaning Respirators
N95 Respirators
Filtering facepiece N95 respirators are intended to be disposable. As such, no cleaning instructions are established for N95 respirators. The respirator may be used until damaged, breathing becomes difficult, or the respirator becomes contaminated with blood, respiratory/nasal secretions, or other bodily fluids. Follow your department’s established guidance and policies for respirator use.
Elastomeric Half-Face and Full-Face Respirators
The following are general instructions for respirator cleaning and disinfecting. Follow the manufacturer’s instructions for your specific respirator.
- Remove the filters or cartridges as they must not get wet or damp.
- Disassemble the respirator.
- Discard and replace any defective parts.
- Wash with soap and water.
- Rinse well with clean, warm water to remove any soap residue from the respirator. Residual soap left on the face piece can cause skin irritation.
- Allow the respirator components to air dry or dry with a cloth.
- Re-assemble the respirator, making sure all components are in their correction positions.
- Re-attach filters or cartridges.
Respirators should be cleaned and disinfected after use on each shift or more often if necessary. If used by more than one worker, the respirator must be cleaned and disinfected after each use.